Devcontainer란?
Devcontainer 공식문서: Developing inside a Container using Visual Studio Code Remote Development
VScode에서 지원하는 도커 내에서 개발하는데 도움을 주는 개발환경 세팅 툴
프로젝트 내부의 devcontainer.json 파일을 설정해 주는 것만으로 다른 사람과 쉽게 프로젝트와 개발 환경 공유가 가능해짐.
그냥 컨테이너 빌드해서 공유하면 되지 않나?
docker conatiner를 따로 생성하고 실행하는 것을 관리하다보면 몇 가지 작업들을 특히나 포팅을 연속으로 여러가지를 하게 되면 일일이 docker naming도 해줘야하고 image 따로 container도 관리해야 하는게 많아짐. 또한 작업 중에 사용환경도 같이 업데이트가 되고 하다보면 버전 컨트롤이 어려워짐. 그리고 무엇보다 다른 팀원들과 공유를 할때 그 팀원이 docker container를 생성할때 사용하는 flag도 shell script의 형태라든지 어떻게든지 공유를 하긴 해야함.
→ 이러한 도커, 도커 설정, 엮여있는 프로젝트와 업데이트 된 환경도 git으로 관리할 수 있도록 도와주는것이 devcontainer이다. 무엇보다도 다른 사람과 공유되었을때 vscode에서 Rebuild and reopen in container 이 버튼 하나면 누구나 별다른 설정 필요 없이 같은 개발 환경에서 작업이 가능해진다. 또한 엄청난 용량을 가지는 docker를 docker hub에서 공유할 필요 없이 간단한 docker script로 공유가 가능해져서 docker 관리 차원에서도 효율적이다.
어떻게 쓰는건가?
간단하게 프로젝트 최상위 폴더에 .devcontainer/devcontainer.json 이 파일을 만들고 설정을 해주면 된다. 팀 내에서는 Dockerfile이 어떤식으로 만들어졌는지 공유 되는 것이 좋기도 하고 docker hub의 용량 관리의 효율을 위해 base image외에는 docker build file로 공유하는 것이 좋다. 여기서는 docker build file을 공유했기 때문에 직접 빌드해서 container를 생성하기 위해서 devcontainer안에 "bulld": {"dockerfile": "Dockerfile"} 이라는 옵션을 넣고 .devcontainer/Dockerfile 이 경로에 아래와 같은 docker build file을 작성했다.
1
2
3
4
5
6
7
8
9
10
11
12
13
14
15
16
17
18
19
20
21
22
23
24
25
26
27
28
29
30
31
32
33
34
35
36
37
38
39
40
41
42
43
44
45
46
47
ARG VERSION=21.06

FROM nvcr.io/nvidia/pytorch:${VERSION}-py3

RUN apt-get update && \
    apt-get install -qq -y \
    zsh \
    wget \
    git \
    build-essential \
	curl

RUN apt-get install -qq -y libgl1-mesa-glx

# COMMON
RUN pip install wandb plotly open3d

############################### FOR BEVfusion #################################

# install OPENMPI
RUN wget https://download.open-mpi.org/release/open-mpi/v4.0/openmpi-4.0.4.tar.gz && \
	tar xvzf openmpi-4.0.4.tar.gz && \
	cd openmpi-4.0.4 && \
	./configure --prefix=/opt/openmpi --enable-mpi-threads && \
	make all && \
	make install && \
	cd .. && \
	rm -rf openmpi-4.0.4 openmpi-4.0.4.tar.gz && \
	echo "OPENMPI_PATH=/opt/openmpi\nMPI_HOME=\${OPENMPI_PATH}\nif ! echo \${PATH} | /bin/grep -q \${OPENMPI_PATH}/bin ; then\n\tPATH=\${OPENMPI_PATH}/bin:\${PATH}\nfi" > /etc/profile.d/openmpi.sh && \
	echo "/opt/openmpi/lib" > /etc/ld.so.conf.d/openmpi.conf && \
	ldconfig

RUN pip install mmcv-full==1.4.0 -f https://download.openmmlab.com/mmcv/dist/cu113/torch1.9.0/index.html

RUN pip install mpi4py==3.0.3 pillow==8.4.0 tqdm torchpack nuscenes-devkit opencv-python==4.5.5.64 mmdet==2.22.0

###############################################################################

# Comment below lines if you don't want to use Zsh
RUN wget https://github.com/robbyrussell/oh-my-zsh/raw/master/tools/install.sh -O - | zsh || true \
	&& git clone https://github.com/zsh-users/zsh-autosuggestions         ${ZSH_CUSTOM:-~/.oh-my-zsh/custom}/plugins/zsh-autosuggestions     \
	&& git clone https://github.com/zsh-users/zsh-syntax-highlighting.git ${ZSH_CUSTOM:-~/.oh-my-zsh/custom}/plugins/zsh-syntax-highlighting \
	&& git clone https://github.com/zsh-users/zsh-completions             ${ZSH_CUSTOM:-~/.oh-my-zsh/custom}/plugins/zsh-completions         \
	&& git clone https://github.com/supercrabtree/k                       ${ZSH_CUSTOM:-~/.oh-my-zsh/custom}/plugins/k
ADD .zshrc /root
ENV SHELL /bin/zsh
작성한 dockerfile을 기반으로 container를 생성하기 위해서 아래와 같이 devcontainer.json에서 옵션을 설정해 주었다. 이 옵션들에 대한 자세한 내용은 다음 사이트에서 볼 수 있다.
1
2
3
4
5
6
7
8
9
10
11
12
13
14
15
16
17
18
19
20
21
22
23
24
25
26
27
28
29
30
31
32
33
{
	"name": "bevfusion",
	"build": {
		"dockerfile": "Dockerfile",
	},
	"containerEnv": {
		"DISPLAY": "${localEnv:DISPLAY}",
		"XAUTHORITY": "${localEnv:XAUTHORITY}",
		"NVIDIA_VISIBLE_DEVICES": "all",
		"NVIDIA_DRIVER_CAPABILITIES": "compute,utility,graphics",
		"QT_X11_NO_MITSHM": "1"
	},
	"mounts": [
		"source=/tmp/.X11-unix,target=/tmp/.X11-unix,type=bind,consistency=cached",
		"source=/data,target=/data,type=bind", // for local data mount
	],
	"runArgs": [
		"--gpus=all",
		"--security-opt=seccomp=unconfined",
		"--network=host",
		"--privileged",
		"--ipc=host",
	],
	"settings": {
		"editor.detectIndentation": false,
		"editor.insertSpaces": false,
	},
	"extensions": [
		"ms-python.python",
		"kevinrose.vsc-python-indent",
		"ms-python.pylint",
	],
}
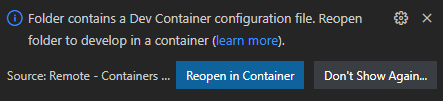
이 파일들이 있는 프로젝트를 vscode로 열면 vscode의 화면 아래에 다음과 같은 창이 뜰텐데 Reopen in container 만 눌러주면 서버에서든 로컬에서든 도커에서 native환경처럼 작업할 수 있게 된다.
Dockerfile과 devcontainer.json을 프로젝트와 같이 관리하면서 얻는 장점은 공동작업이나 다른 사람이 작업한것을 나중에 이어받아서 작업할때 복잡하게 누가 누구의 세팅을 도와줄 필요없이 실행이 가능하다는 점이 있다. 특히나 손뗀지 오래된 코드의 경우 나중에 다시 돌릴 때 이걸 어떻게 돌렸지 싶은 생각이 들면서 엄두가 안나서 버려지는 경우가 많은데 Reopen in container 하나로 과거의 세팅을 불러올 수 있다.
그리고 dockerfile 내부에 dependency에 대한 정보가 다 들어가 있으니 documentation에 들어가는 노고가 줄게 된다. 공동작업중에 코드와 함께 dependency가 업데이트 되었을 때도 dockerfile을 같이 업데이트 해주면 rebuild 하나로 서로 골머리 아플일 없이 행복할 수 있다.